Getting started
Table of contents
- Zoom to your community
- “What am I looking at?”
- Change the basemap
- View development/component information
- Apply optional filters
- Turn layers off
Zoom to your community
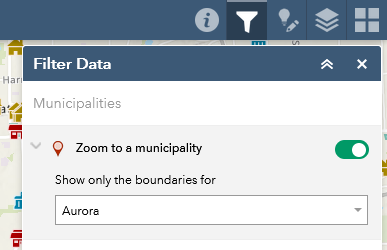
Upon opening the Development Pipeline Data Inspector and closing the introductory splash screen, you will see a map of all of the municipalities and unincorporated areas in the region. No development data is displayed when zoomed out this far, so the first step is to select a specific community to zoom in to.
When the map is first opened, the Filter Data panel should be visible on the right side of the window. (If it is not, click the icon that looks like a funnel in the upper-right corner.) This panel provides several options for filtering the data to limit the amount of information being displayed, but only the first one, Zoom to a municipality, is required. From the dropdown list, select your community. Once a selection has been made, the map will zoom in to show only that municipality and any developments within or near it.
“What am I looking at?”
Municipal boundaries are represented by orange polygons: 
Developments are represented by teal polygons: 
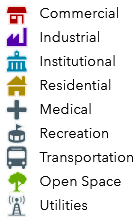
Each development conatains one or more components, represented by icons corresponding to the major land use(s) present in the development:
The placement of components on the map does not necessarily reflect their actual location within the overall development, since CMAP generally does not have that information. Instead, the location of components within a development is simply determined by the “centroid” point of the development polygon (with multi-component developments showing the components arranged in a circle around this centroid point). However, many of the component records do include an address or intersection that provides slightly more precise location information.
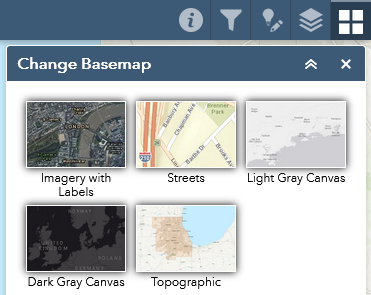
Change the basemap
By default, the map displays a “topographic” basemap theme, which shows roads, rail lines, water features, parks, airports, and other points of interest. Additional themes are also available via the Change Basemap panel (upper-right corner) to match your preference.
View development/component information
Click on any development outline or component icon to view a pop-up showing information about it. (Note: since the development outlines are based on parcel data which generally does not include rights of way, many developments are represented by “multi-part” polygons that appear to be separate shapes but are in fact a single record.)

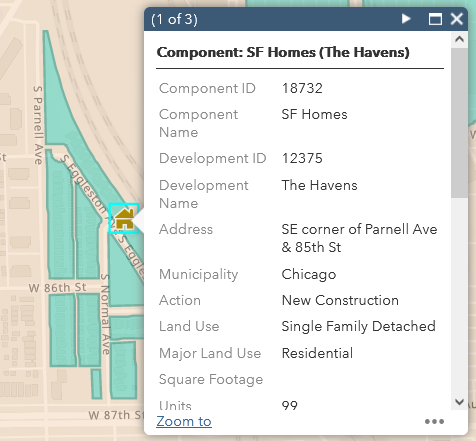
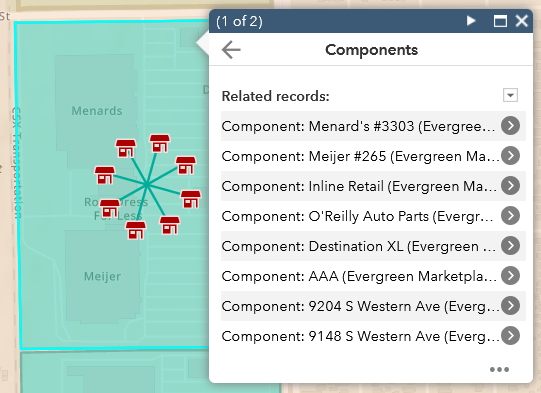
For developments with multiple components, if you click on the development polygon, scroll to the bottom of the popup window, then click “Components” (in the “Related tables” section), the popup will display a list of all of that development’s components. (Similarly, a “Developments” link is displayed at the bottom of the popup for a component, to display information about the overall development.)
Apply optional filters
Within the Filter Data panel used to select your community, there are four additional filters that you may choose to turn on (using the on/off button to the right of each one). After turning on a filter, each one has an additional dropdown from which a selection must be made.
-
Filter developments by municipality: if you only want to view the developments that are specifically within your community, turn on this filter and select your community’s name from the dropdown menu.
-
Filter components by municipality: if you only want to view the components that are specifically within your community, turn on this filter and select your community’s name from the dropdown menu.
-
Filter components by status: if you only want to view the components with a certain status (e.g. proposed, under construction, completed), turn on this filter and select one or more status types from the dropdown list.
-
Filter components by land use: if you only want to view the components with a certain land use (e.g. commercial, industrial, residential), turn on this filter and select one or more land use types from the dropdown list. Note that the filter only includes the major land use types, whereas individual component records also include a more detailed land use type (e.g. single family detached, multi family, mobile homes).
It is also possible to specify a custom filter for any of the map layers by clicking the Filter actions  button at the bottom of the Filter Data panel and then clicking the Create a custom filter
  button. Then, all you have to do is select the layer to filter from the dropdown, click the + Add Expression button, and use the options presented to construct a filter based on the available variables. For example, if you wanted to display only components larger than 100,000 square feet, you could specify that as follows:
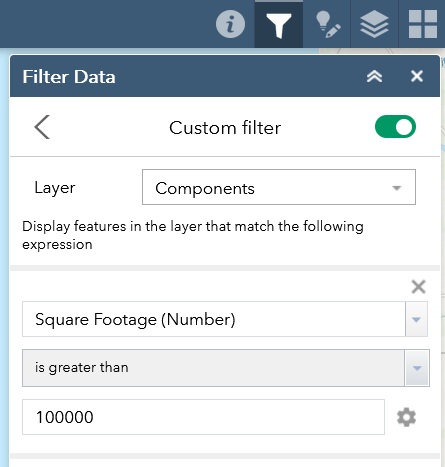
All active filters will be applied simultaneously, and only the components or developments meeting all of the criteria will be displayed.
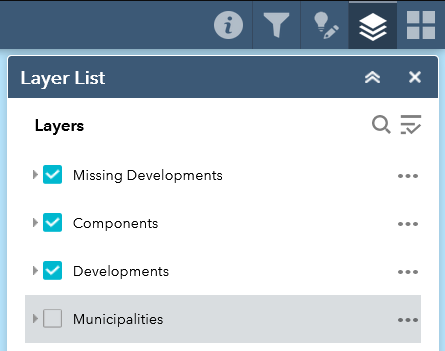
Turn layers off
If you would prefer to view the map without municipal boundaries, or view only the development outlines without component icons, you can turn individual layers on or off by unchecking the boxes next to their names in the Layers panel (upper-right corner).